I have been interested in playing with influence maps for some game development demos for a while now, and have finally started really digging into them. One thing I discovered after reading some articles is that most of them lack to show a complete simple example of how to implement the logic, so I plan to do that here. Full disclosure, I’m not a professional game developer, but I think some of my naive/basic code examples will help other hobby game developers like me who want a place to start understanding these concepts.
What are influence maps?
Influence maps in video games are data structures that are used for “spatial reasoning”. What does this mean? Here are some examples of situations where influence maps can help:
- What areas of the map are safe from enemies, or contain the most enemies?
- Where are the resources in a map and how far away are they?
- Temporary memory of where units were located or where events occured
That just scratches the surface of what influence maps can do. They can make your game’s AI seem a lot more intelligent and natural without complex state machines, or CPU intensive logic.
Types of influence maps
Depending on the type of game, and how the influence map is used, there are a couple options for how to represent them in code:
- 2D grid based map, with varying sized tiles depending on detail required
- A graph based map, with edges connecting to nearby nodes
For 2D games that already have grids for maps, the 2D grid fits quite well, but just be aware that it can waste more memory if you have large uniform areas with not much going on in between. With 3D games or games like dungeon crawlers with many maze-like rooms, a graph might work well because each room or hallway could be a node in the graph, and the connections between them determine how the influence propagates through the level.
Influence source and propagation
The source of an influence will typically define how strong the influence is at that point, and several other properties of how it behaves including decay and momentum. There are a lot of different ways to calculate how influences propagate or spread through a map. The one I am going to use is similar to how the blurring function works in an image editor like Photoshop. I will be using a 2D grid style influence map, and only propagating influence vertically and horizontally for simplicity (distance of 1 tile). Below is the rough psuedocode of how it works.
influence_map = [width][height]
influence_buffer = [width][height]
distance = 1

for source in influence_sources
  influence_buffer[source.x][source.y] = source.strength

for y in height
  for x in width
    max_influence = max(get_neighbors_influence(influence_buffer, x, y))
    max_influence = max_influence * exp(-distance * decay)

    current_influence = influence_buffer[x][y]
    influence_map[x][y] = lerp(current_influence, max_influence, momentum)

influence_buffer = influence_map
First it loops over the sources and sets the influence strength at each source into a buffer. Next it iterates over all grid tiles and checks neighbor influence values.
The get_neighbors_influence method will get a list of influence strengths from above, below, left, and right of the (x, y) position given.
Once a maximum influence value is found, the value is “decayed” by some rate, in this case it is decaying exponentially, but you can choose any number of formulas depending on how it should behave.
Finally the decayed value is taken and linear interpolation is used to change the current grid tile influence at the rate of momentum (a value between 0 and 1).
Using a buffer to store the previous values and applying the new values to the map during propagation is done so that new influence values that were just calculated in the row above do not affect how the next row of influence values are calculated.
Decay
This is the rate at which the influence weakens (eventually to zero). Like I mentioned above, the decay function can vary depending on the behavior. Exponential decay is most common from what I’ve seen, but linear or even cubic decay functions could be used too.

Momentum
How quickly should the existing influence at a location tend towards the new influence value? This is what momentum controls. Technically this isn’t required and the new influence value can be set immediately (this represents a momentum of 1.0), but adjusting the momentum can allow for more interesting behavior.
The linear interpolation in the above pseudocode is using the following formula, where t is a number between 0 and 1:
lerp(a, b, t) == a + t(b - a)
Momentum will not affect the final values of the influence after letting it completely propagate until the value decays to zero. It will only change how quickly the influence value of a single point changes from the old value to the new value with each update pass. If the influence should spread out very quickly, but also disappear quickly after the source is gone, a higher momentum is required. A good example of something in a game needing high momentum could be a bomb that explodes on the map. For a slow spreading influence that should linger after the influence source is gone, a lower momentum value is better. An enemy that spreads a lingering poison wherever it moves would be a good candidate for a low momentum influence.
Update frequency
How frequently the influence map updates really comes down to the performance requirements or limitations of the game. For a turn-based game the influence maps can be updated once a turn, and so the update frequency is very low. For a real-time strategy game or city simulator the update frequency may need to be much higher, but not too often where it begins to affect the framerate. Most likely updating influences once every few seconds is quick enough to keep AI actors up to date.
Putting it all together
For me it was difficult to understand exactly how the different parameters of an influence map can affect the result without some visuals. Here are some graphical examples of how different parameters change the behavior of the influence. To keep things readable, I only rendered influence values 1.0 or greater.
Comparing a higher decay of 0.8 (left) to a lower decay of 0.26 (right), with the same starting strength of 5.0 and momentum of 0.3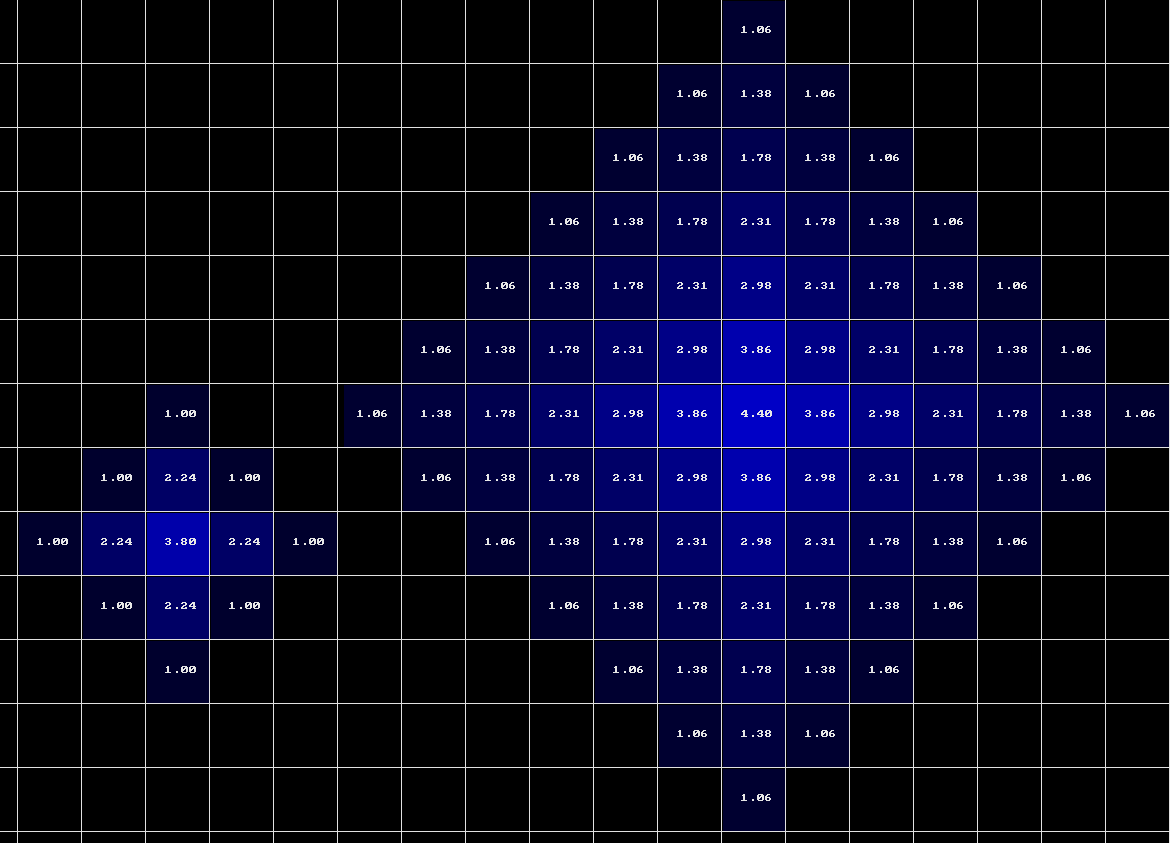
Low momentum set to 0.2 with a strength of 5.0, decay of 0.5, and update frequency of 100 milliseconds.
High momentum set to 0.8 with a strength of 5.0, decay of 0.5, and update frequency of 100 milliseconds.
Example code
Below is some very basic C++ code that deals with all the parameters we discussed above and propagates a positive influence across a 2D grid. This is the same propagation logic I used to create the visual examples above.
To use this class just initialize it with some values, set influence sources with add_influence(), and call propagate_influence() at any update frequency.
influence_map.hpp
#include <list>
#include <vector>

class InfluenceMap {
    public:
        InfluenceMap(int width, int height, float strength, float decay, float momentum);

        void add_influence(int tile_x, int tile_y);
        void remove_influence(int tile_x, int tile_y);

        void propagate_influence();

        const std::vector<float>& get_influence_map() const { return influence_map; }
        const int get_width() { return width; }
        const int get_height() { return height; }
        const float get_strength() { return strength; }
        const float get_decay() { return decay; }
        const float get_momentum() { return momentum; }

    private:
        struct InfluenceSource {
            int x, y;
        };

    private:
        int width, height;
        float strength, decay, momentum;
        std::list<InfluenceSource> influence_sources;
        std::vector<float> influence_map, influence_buffer;
};
influence_map.cpp
#include <algorithm>
#include <cmath>

#include <influence_map.hpp>

InfluenceMap::InfluenceMap(int width, int height, float strength, float decay, float momentum) :
    width(width),
    height(height),
    strength(strength),
    decay(decay),
    momentum(momentum),
    influence_map(width * height, 0.0f),
    influence_buffer(width * height, 0.0f) {}

void InfluenceMap::add_influence(int tile_x, int tile_y) {
    if (tile_x >= 0 && tile_y >= 0 && tile_x < width && tile_y < height) {
        auto itr = std::find_if(influence_sources.begin(), influence_sources.end(),
            [&](const InfluenceSource& s) { return s.x == tile_x && s.y == tile_y; });
        if (itr == influence_sources.end()) {
            InfluenceSource src = {tile_x, tile_y};
            influence_sources.push_back(src);
        }
    }
}

void InfluenceMap::remove_influence(int tile_x, int tile_y) {
    if (tile_x >= 0 && tile_y >= 0 && tile_x < width && tile_y < height) {
        std::erase_if(influence_sources, [&](const InfluenceSource& s) { return s.x == tile_x && s.y == tile_y; });
    }
}

void InfluenceMap::propagate_influence() {
    for (const auto& src : influence_sources) {
        // first setup the sources of influence
        influence_buffer[width * src.y + src.x] = strength;
    }

    // not dealing with diagonal influence, so the distance is always 1.0
    float coefficient = expf(-1.0f * decay);

    for (int y = 0; y < height; ++y) {
        for (int x = 0; x < width; ++x) {
            float max_influence = 0.0f;

            // discover neighboring influences (vertical/horizontal only)
            if (y > 0) {
                float tmp_influence = influence_buffer[width * (y - 1) + x] * coefficient;
                max_influence = std::max(tmp_influence, max_influence);
            }
            if (y < height - 1) {
                float tmp_influence = influence_buffer[width * (y + 1) + x] * coefficient;
                max_influence = std::max(tmp_influence, max_influence);
            }
            if (x > 0) {
                float tmp_influence = influence_buffer[width * y + (x - 1)] * coefficient;
                max_influence = std::max(tmp_influence, max_influence);
            }
            if (x < width - 1) {
                float tmp_influence = influence_buffer[width * y + (x + 1)] * coefficient;
                max_influence = std::max(tmp_influence, max_influence);
            }

            // linearly interpolate the influence based on the strongest neighbor and momentum
            influence_map[width * y + x] = std::lerp(influence_buffer[width * y + x], max_influence, momentum);
        }
    }

    // now apply changes to the buffer for the next calculation
    influence_buffer = influence_map;
}
Conclusion
I hope this was somewhat helpful at breaking down what an influence map is, what it could be used for in games, and how to actually create one. Next time I will cover combining influence maps into compound maps, and some possible optimizations for applying influences onto a map.